 Warmer weather gets us thinking about being outside and enjoying the sunshine. But, we also wonder how high our electricity bills will be when we’re cooling off inside. If you’re looking to cut your cooling costs without sacrificing your family’s comfort and summer fun, check out these 11 energy savers tips.
Did you know that the average ceiling fan, run at its highest speed, consumes about 75 watts of power? If you run your ceiling fan for 24 hours a day, and the price per kWh is $0.10, using a ceiling fan would cost you $0.53 per day.
Now, compare that to an air conditioner that consumes roughly 2,000 watts of power. If you run your ceiling fan for 24 hours a day, and the price per kWh is $0.10, using the air conditioner would cost you $4.80 per day.
This simple exercise allows you to quickly see how using the fans in your home can translate to reduced energy bills.
Furthermore, The U.S. Department of Energy, says that cooling your home with ceiling fans will allow you to raise your thermostat by roughly four degrees, which can further reduce your energy bill by up to 30 percent.
During the spring and summer, direct sunlight can significantly warm up your home. One energy savers tip is to prevent UV rays from bringing unwanted heat into your house, as a way to reduce your energy bill.
According to ENERGY STAR, a typical home will save $126–$465 a year when replacing single-pane windows with ENERGY STAR qualified windows, and $27–$111 a year when replacing double-pane windows.
Bonus energy savers tip: Invest in heavily-insulated drapes to block even more heat from entering your home as an additional way to save energy in the spring.
Letting hot air into your home — or cold air out — due to gaps around your windows and doors might be costing you more than you expect. According to The U.S. Department of Energy, sealing any leaks or drafts in your home can save you between five and 30 percent per year in energy costs.
Sealing leaks on your doors and windows is a simple process, too. All you need is caulk or weatherstripping materials and you can block unwanted airflow in a snap.
Homeowners can manage the airflow in a number of ways. The first is by using exhaust fans strategically. Exhaust fans pull the warm air from your home and send it outside, on particularly warm days, turn your bathroom and kitchen exhaust fans on to force warm air outside to decrease the use of your AC.
You can also rearrange your furniture away from your heating and cooling systems baseboard or registers. By moving obstacles away from your home’s airflow, you can maximize circulation, heating and cooling more of your home.
Bonus energy savers tip: If a cool day is in the forecast, try to maximize heat from your oven or stovetop. When you finish baking, leave the oven door open so the warm air can circulate through your home.
You might be surprised to learn that a refrigerator accounts for almost 14 percent of the average homeowner’s electrical bill, according to the U.S. Department of Energy.
One energy savers tip is to ensure all of your refrigerator’s components are running well, so it doesn’t take up more energy than normal. That’s why you should inspect your refrigerator gaskets often.
Your refrigerator gasket is the rubber seal around the inside of the door and is responsible for keeping the cold air in. If this gasket breaks or cracks, it can allow the warm air inside of your home to enter your refrigerator, causing the compressor to work harder to maintain a cool temperature, and increasing your electricity bill.
If you’re still using incandescent bulbs, you should know that only 10 percent of the electricity they consume is used for light, the rest is turned into heat. Not only does that mean you’re paying more for less light, but you’re also unknowingly warming your home.
Opt for more efficient lights like LEDs, which according to the Department of Energy use at least 75 percent less energy and last 25 times longer than incandescent lighting.
And remember to turn the lights off when you’re not in the room. For a 40 watts lightbulb that’s on for one hour, you can expect to consume 0.04 kWh. If your electricity rate is $0.10 per kWh, every hour means $0.04 out of your pocket — at 24 hours a day, that’s nearly a dollar a day!
Bonus energy savers tip: For even more savings, harness the power of the sun! If it looks like a chilly night is in the forecast, leave curtains open during the day to allow the sunlight to warm the room and close them at night to keep the heat in so you can rely less on your heating system.
If you get your air conditioner tuned up in the spring, you’ll prevent yourself from potential meltdowns in the summer. It’s important to call in a professional to tune-up your AC so you and your family can be safe!
Air conditioners are high voltage, and without proper knowledge and equipment, it can be dangerous to take a tune-up on as a DIY project.
During a tune-up, a licensed professional comprehensively look for any AC system failures:
It’s especially important to call in the pros if you suspect a leak in your equipment. It’s very difficult to inspect an AC for leaks without training and expertise in the field. But, leaks decrease the efficiency of your system and cause potential health issues for you and your family.
Remember to check your furnace and AC filter at the start of the season, and change it out if needed. A clean filter will maximize your system’s output.
Need help changing your filter?
Watch this video that demonstrates how you can easily make the tune-up on your own:
Pro Tip: Warm weather is right around the corner! Remember you can get your AC system service any time the temperature outside of over 65 degrees. During an AC tune-up, a technician can perform this service with limited access to your home, so rest assured your family, and our staff will be protected during the service!
First things first, check the thermostat on your current water heater. Many manufacturers automatically set water heater thermostats to 140°F, though 120°F will work for your home just fine.
Adjusting the thermostat to 120° will help you avoid scalding temperatures when you turn on your hot water, and will also cut energy costs. Even when you’re not actively using your water heater, reducing the temperature will save you $36 to $61, annually, in standby heat savings. And, adjusting the heat down will save you more than $400 per year, during active water heater use, according to The U.S. Department of Energy.
Bonus energy savers tip: Each year, drain a quarter of your water heater tank to remove sediment and debris to ensure your water heater is working as efficiently as possible all year round.
While you’re at it, don’t just focus on the cleanliness of your hot water heater, also pay attention to how frequently you use it. Minimizing the amount of hot water you use throughout the year can save you on your energy bills. Remember to:
Remember, you are in control of how frequently your system runs! Complete control over your thermostat is especially useful during the spring when we experience colder nights and warmer days. That’s because constantly adjusting the temperature inside your home can be a costly mistake: The cooler you keep your home with an air conditioner, the higher your electric bills will be.
According to the U.S Department of Energy, 78° F is the most efficient temperature to run your AC when you’re home. While you’re away, it’s best to keep the thermostat at 85°. Adjusting your temperature down to just 72° can increase your energy bills by roughly 47 percent.
Read our full article on maximizing the lifespan of your AC unit, while protecting your energy bill.
ENERGY STAR-qualified windows can save you heaps of money this spring, but that’s not the only upgrade you can make. There are plenty of other appliances you can upgrade to increase your savings even more.
By equipping your home with ENERGY STAR refrigerators, dishwashers, and heating and cooling systems you can reduce your home energy use by up to 50 percent.
 A question that we get often is “How long will my heating oil last?” And on cold winter mornings, these are important questions to keep your family and your home warm.
You want to get the most out of your heating oil and you want to live as efficiently as possible and conserve energy.
Typically, the calculation for how long heating oil lasts is hinged on the size of your home and how long you leave your furnace running. Using a general rule of thumb, most homeowners use tanks 300 gallons or less for one and two-bedroom homes.
However, having a good understanding of how long your heating oil lasts is important and dependent on a number of factors other than the size of your home. External temperature, the condition and maintenance of your furnace, how extendable the life of your heating oil is are all factors to consider.
Several factors impact how long your heating oil will last. Let’s cover each of those.
The amount of heating oil consumed during a blizzard or extremely cold weather is different from that of a warm winter season. Extremely cold outside temperatures increase the rate of heating oil consumption — the more the temperature drops, the higher the rate of heating oil consumption. The wind is also something to consider, as it accelerates the rate of heat loss from a house.
What’s the condition of your furnace and how long have you been using it? Has it been well maintained or has it suffered some damages without adequate salvaging? Older, aging furnaces and ill-maintained ones have a tendency to consume more oil than newer models that have been designed for efficiency. You may want to consider upgrading your furnace and having regularly scheduled maintenance.
What your oil is being used for specifically is essential for determining how long your heating oil will last. Are you using it for heat, or for both heat and hot water? If you are using it for both, you’ll definitely consume more than the heat-only use case. Also, you may want to check how long your furnace stays on, especially if you do not have a programmable thermostat that can automatically adjust your temperature inside.
A measuring technique by Inspectapedia suggests that you can make a very rough guess of your usage by noting how many minutes per hour your oil burner is running. Denoting that oil burners use a spray nozzle that delivers oil at a flow rate of around 0.8 to 1.7 gallons per hour is important. You’ll also need to know your oil tank size and how much oil you have in it (if it’s not a full tank of oil).
Santa Energy’s tracking technology saves you a load of stress by calculating precisely when your home will need a heating oil refill and gets your heating oil filled automatically before you run out.
Using the calculation above, 1.7 gallons per hour x 10 hours a day (assuming the number of hours you spend at home is 10 hours) = 17 gallons a day. That means, 100 gallons of oil will last you about six days (100-gallon tank / 17 gallons per day = 5.8 days).
Or, if you want to calculate using a full day (24-hours), 1.7 gallons per hour x 24 hours a day = 40.8 gallons a day. If your oil tank size is 100 gallons, then your tank will last two-and-a-half days (100-gallon tank / 40.8 gallons = 2.45 days).
Following our previous calculations, 10 gallons of heating oil at a consumption rate of 1.7 gallons per hour should last 5.8 hours. (10-gallon tank / 1.7 gallons per hour = 5.8 hours).
Considering that most residential heating oil consumers are in the Northeast and about 20% of households in the Northeast Census region use heating oil as their main space heating fuel, it is helpful to make estimates based on outside temperature on how long heating oil lasts in this region.
Here’s a chart that’ll help you make estimates based on outside temperature:
| Average Outside Temperature (°F) | Approximate Gallons Used in 24 Hours | |
| 15 | 7.8 | |
| 20 | 7.0 | |
| 25 | 6.2 | |
| 30 | 5.3 | |
| 35 | 4.5 | |
| 40 | 3.7 | |
| 45 | 2.8 | |
| 50 | 2.0 |
The question after examining all of these is, how do you then conserve your heating oil?
Make sure you have the right and well-maintained equipment, from your tank to your furnace. Have your furnace tuned up to keep it working efficiently. Your tank should also be checked regularly for degradation, as a corroded or leaky oil tank will degrade your oil faster and external impurities can penetrate your oil.
If your house is well insulated, heating oil conservation is easier. Good insulation means the heat is retained in the house, rather than being dispersed through the roof, windows, and walls. Invest in an energy audit and insulate your home properly, seal gaps around the edges of windows and floorboards, reduce drafts.
According to Energy Saving Trust, you could stop losing around 33% of your heat through uninsulated walls which will make your home feel warmer and more comfortable and save costs.
Use a Smart Thermostat to regulate the heat, reduce heat wastage and adjust usage when you are not home.
Dressing in layers and decorating your house for warmth are effective ways of generating heat and conserving energy.
As the demand for a product increases, the price of that product begins to rise. Oil prices tend to increase with demand, so having your tank filled during a low-demand season is good for you, especially when supply problems can arise during the high-demand winter season.
In addition to our heating oil delivery services, Santa Energy provides a variety of other heating services including furnace maintenance, repair, and new heating system installation.

(Photo/Unsplash)
As such, one of the most common debates is whether Northeasterns should convert their heating oil systems to natural gas.
The first question to ask is will it save you money in the long run?
The federal government’s 30% tax credit for upgrading to a high-efficiency furnace ended nearly a decade ago, and homeowners that didn’t jump on the credit may be left asking themselves if it’s still worth the effort.
Let’s cover the differences in each heating source, from the BTU output, conversion costs and environmental impact to discover which fuel suits your home best.
British thermal unit (BTU) is the most common way to measure a unit of heat in the United States. Specifically, BTUs measure the amount of energy needed to raise one pound of water 1°F at sea level. This measurement is a gauge for energy use, energy effectiveness, and heating system sizing.
Simply put, the higher the BTU rating the more powerful, and higher heat output it has.
When comparing natural gas and heating oil, consider the following breakdown:
Mathematically, heating oil contains more heat per BTUs than natural gas (and than most other fuels available on the market). Therefore, heating oil outputs more heat, making it the more efficient option of the two.
Heating oil is at its most efficient and environmentally-friendly state when used as bioheat.
Bioheat is a blend of biodiesel and ultra-low sulfur heating oil. The advancement in fuel properties from heating oil is great news for Northeasterns, as the fuel can be used in your oil tank without any modifications to your tank or furnace.
From an environmental standpoint, bioheat is notable because unlike natural gas, it’s a renewable fuel, and touts lower carbon emissions.
During the Paris Climate Change Convention in 2016, more than 200 nations agreed to limit carbon gasses that pollute the earth by promoting the use of renewable energy sources and low carbon options. Bioheat falls under the same category as wind and solar energy, which are all acknowledged as sources of renewable energy.
Natural gas, on the other hand, falls into the same bracket as petroleum and coal, which are nonrenewable sources of energy, also known as fossil fuels.
Methane losses from natural gas systems pose a significant problem for global warming as well. Methane is a greenhouse gas 21 times more dangerous than poisonous carbon dioxide. And, according to the Scottish Environment Protection Agency, methane ranks amongst the worst of the greenhouse gases.
When considering the environmental impact between natural gas and biofuel, the heating oil option wins by a landslide.
Homeowners considering the conversion from heating oil to natural gas need to estimate the cost to make the switch. The grand total will vary based on many factors, including:
However, according to CBS Boston, the switch can cost anywhere from $4,500 to $7,000. New England Cable News increases the prices even more, stating conversions can cost anywhere from $3,500 to $10,000.
Though there may be long-term savings with a natural gas conversion, the upfront cost, coupled with the environmental impact cause many homeowners pause.
According to the Consumer Energy Council of America, this fuel conversion could be an “expensive gamble”.
Experts zero in on some of the dangers of natural gas as a caution to homeowners considering the switch:
Though every homeowner will need to weigh the pros and cons of natural gas and heating oil for themselves, it’s important to inform yourself on all aspects of the conversion.
Want to learn more about the difference between heating oil and natural gas? Check out the following resources:
 The time to think about taking care of your home’s heating system is before the temperatures dip into freezing and you’re eyeing the thermostat in your house.
Not only can a few easy steps help maintain your whole-house heating system, but it may also prolong the life of your furnace, saving you money in the long run. And since heating your home typically makes up 42% of your utility bill, it’s a good idea to start thinking about how to take care of your heat-generating investment.
Yes, factors such as home size and gas rates can affect your utility bill, but so can the efficiency and care of your furnace.
These easy tips can help maintain the health and life of your furnace.
Most home furnace issues can be sourced back to a dirty filter. When you leave a dirty air filter in place, airflow is restricted, which leads to reduced energy efficiency, unnecessary wear and tear on your furnace and potential for overheating. Energy Star recommends checking your air filter every month, especially during months of heavy usage. At a minimum, you should be changing out your air filter every three months, to prevent dust and dirt from building up in the system. If you live with pets or in a house with a smoker, you may need to change the filter more often.
Studies show that the average six-room home in the United States collects up to 40 pounds of dust each year. Where this dust is coming from is entirely different questions that even scientists have been trying to answer. What we do know is that this dust is settling in your home’s air ducts, and is forming a thick layer on the inner walls. This dust not only is then circulated throughout the home, triggering allergies, but it can also damage your heating system.
The National Air Duct Cleaners Association recommends cleaning your air ducts every three to five years, however where you live may have an impact on how frequently you clean your air ducts.
The blower motor is critical to pushing the warmed air through the heat exchanger, which is then distributed through the rest of the home. It’s important to ensure your house reaches the correct temperature. If your blower motor is running constantly but your house isn’t heating up, you may have a problem. If you don’t properly maintain the blower motor, it can break down. A trained technician can help you determine whether the issue is with the blower motor.
For your heating system to work as efficiently as possible, the heated air must be able to circulate completely in the system, and throughout the house. This means making sure all your vents are working properly and the air is flowing freely. Inspect your vents, remove any furniture, boxes or household items that may be blocking the flow of air. Allowing the system to work as intended means it’s working more efficiently and not as hard to heat your home.
Making sure your thermostat is in proper working order is an important step to caring for your home’s heating system. Before the cold season starts, turn up the thermostat and listen for the furnace to turn on, and continue running. If the furnace turns on, and then off after a short time, you may need to have your thermostat adjusted (either recalibrated or replaced) or your heat exchanger is malfunctioning. You will need to call a professional to inspect the unit.
One of the most important things you can do for your home heating system is to get it professionally inspected and tuned up once a year. It’s a great way to extend its lifespan and prevent future breakdowns. Most companies, like Santa Energy, offer heating system tune-ups. This means they will send a professional heating technician to your house to inspect, clean, and fine-tune the different components of your furnace.
While many of these things can be done on your own, if you don’t feel comfortable handling these tips, you should consider hiring a technician. A professional heating technician can address:
Ensuring your home’s furnace is running properly and efficiently is critical to a well-heated home to make sure you’re not spending more than you need to, in order to heat your home in the winter.
 If you live in the northeast, snow is nothing new. The first storm of the winter season has most likely already passed, and we can all be sure there are more to come.
Still, no matter how many times you have shoveled your driveway, there are always ways to improve. Use these tips next storm for a safer, more efficient shoveling experience.
For many of us, shoveling snow is an unpleasant chore, but for others, it’s a downright dangerous activity.
According to the American Heart Association, shoveling snow can put some people at risk of a heart attack. Especially if you’re not a particularly active person throughout the year.
Sudden exertion, like moving dense mounds of snow, can put a strain on the heart, especially as we get older.
If you don’t prepare your body for shoveling correctly, you can easily injure yourself during the tedious task. That makes it critical for you to take a few precautions before cleaning off your driveway.
Before beginning your shoveling for the day, take a few minutes to stretch out your legs, back, arms, and shoulders. Stretching will warm your muscles up to help prevent injury. If you become tired when shoveling, don’t overdo it, take a break to regain your energy.
The longer that snow sits, the heavier and denser it becomes. Try attacking snow in your driveway when it’s fresh. Even if you anticipate snowfall for the entire day and the idea of going in and out of your home to shovel sounds daunting, remind yourself, it’s easier to shovel two inches of fresh snow than six inches of packed snow. By shoveling in shifts, throughout the day, you’ll have lighter shovels, and you’ll be able to conserve your energy.
If you choose to lift snow, as opposed to pushing it, remember to keep good form so you can protect your body from injury:
Know your limits. Don’t fill your shovel with too much snow at once. Overexertion will make you tired quickly, and could make you more prone to injuries.
If you’ve grown up in the snow, the idea of shoveling is just one that comes with the seasons. But, when is the last time you thought about just how much energy you’re actually exerting while performing the task? During the next storm, be sure to take breaks so you can stay hydrated, eat properly, and refuel your electrolytes while shoveling. Remember to refuel after you’re done shoveling as well.
There is always room for improvement when it comes to your shoveling technique. Consider these tricks for shoveling snow more effectively and efficiently.
You will exert less energy, and protect your back if you push snow rather than lifting it. This is an especially important tip if the snow has gotten ahead of you, and it’s dense and compact.
You might also consider using a snow blower for efficiency. If you decide to use a blower, follow the American Academy of Orthopedic Surgeons standards of safety, which recommends:
Make the best use of your time and be as efficient as possible, by avoiding touching the same snow more than once. Shovelers become victims of the ‘two-touch’ method when piling snow into large banks on the perimeter of a driveway. By using this technique, snow will often slide from the top of these tall mounds back down onto your driveway, causing you to remove it again.
To avoid this from happening, evenly disperse where you dump your snow to avoid tall piles.
Nothing is more frustrating than getting your driveway clear all the way to the street, only to have the plow push the snow right back onto the foot of your driveway. If you are shoveling during a snowstorm or immediately after one ends, chances are the snowplows will still be running. Let them plow the street first because there will be an excessive amount of snow at the foot of your driveway.
Save shoveling this area for last to avoid shoveling it multiple times throughout the day.
Check the weather report! If you see snow in the forecast, prepare by adding salt to your driveway for an easier day of shoveling to follow. Salt on your driveway causes ice to melt because the solution of water and dissolved salt has a lower freezing point than pure water. This means you won’t have to hack the shovel against the ice to break it up, making for a strenuous situation. It will also decrease the density of your snow mound.
At Santa Fuel, we take safety in our community very seriously. If shoveling snow is becoming too much of a burden to you, see if a friendly neighbor, family member, or friend can lend a hand. Some communities have Village Networks that allow you to rely on volunteers to help you move snow when it’s too overwhelming for you.
 On those cold winter mornings, there’s nothing better than pulling up the covers and feeling the furnace turn on, keeping you cozy and warm.
But, did you know that heating your home uses more energy and costs more money than any other system in your home? Energy Saver – an office of the U.S. Department of Energy – notes that heating your house makes “up about 42% of your utility bill.”
While factors like home size and gas rates can affect your utility bill, so can the efficiency and age of your gas furnace.
In this article, we’re going to break down what you need to know about furnaces and more importantly, why your furnace could be losing efficiency.
At its most basic, furnaces heat air and distribute the heated air throughout the house using air ducts.
The efficiency of your furnace is measured by annual fuel utilization efficiency (AFUE), which must be displayed on all new units. AFUE measures how efficiently the furnace converts energy in its fuel to heat over a year.
More specifically, a furnace with an AFUE of 90% means that 90% of the energy in its fuel becomes heat, while the other 10% escapes from chimneys and elsewhere.
Keep in mind, that the AFUE does not include the heat loss that commonly occurs via the ducting or piping, which according to Energy Saver can be as much as 35% of the energy output.
While electric heaters have higher AFUE ratings of 95-100%, they are often the least economic choice for homeowners given the higher cost of electricity.
Over time, it’s common for a furnace to lose efficiency, due to age, as well as wear and tear. But, there are several things you can do to improve efficiency in your furnace, which will improve heating and result in lower bills.
The most common reason for an inefficient furnace is a dirty filter. Most people don’t realize their filter needs to be routinely changed, so they leave the same one in for months, or even years. If you don’t change your heating system’s filter on a regular basis, it not only hinders the unit’s energy efficiency, it can cause long-term damage and reduce the air quality in your home. Check the unit for specifications, but the filter should be changed every few months, if not at least once a year.
It’s not uncommon for even the most sound homes to have air leaks that cause the heated air to escape the house. If your house isn’t properly insulated, your hot air (and your money) could be going out the window – literally. Heat can be lost through drafty windows and doors, through the ceilings, and even your walls
Be sure and keep all baseboard heaters and radiators clear of furniture or other objects to ensure the heat is distributed evenly and as able to reach the entire house.
Loose parts and fittings can create enough space to reduce airflow and cause rattling. Don’t forget to also check the blower fan, which can break or bend. Also, the fan belt is a good place to look for fraying. Lastly, check the combustion chamber for cracks.
In addition to ensuring your furnace is running properly, you should also be weatherizing your home each year. This means reinsulating areas that you know to be leaky or drafty. Use weather-stripping to block air leaks around doors and windows.
Inspect your burners and ensure they are free of debris. If your burner flames are blue, that means the burner is clean. If they’re yellow, you have dirty burners. Turn off the power and gas and then vacuum your burners.
Did you know if your furnace has a bad limit switch your blower could be running all the time? This will result in a shorter life for your blower. When they fail, the heat is always on, making it very hot.
If your furnace vents to the outside, you should always make sure nothing is blocking the vents. Clear any leaves or debris in the area. If you have a heat pump, clear any debris from the fins of the outdoor compressor unit.
As heating systems age, they begin to lose energy efficiency. Even with a new filter and proper maintenance, a furnace that is 15-20 years old will not be nearly as efficient as it was when it was brand new. It may be time for a new furnace.
Regularly checking and maintaining your furnace will help prolong the life of your unit and ensure cost-effective and efficient heating of your home. Before the cold grip of winter hits, consider whether or not you need a new furnace.
 Heating your home during the cold winter months costs more money and uses more energy than any other system in your house.
Energy Saver – an office of the U.S. Department of Energy – notes that heating your house makes “up about 42% of your utility bill.”
Whether you’re on a tight budget, or simply trying to cut back on home expenses, there’s no need to suffer in a cold home this winter. The following tips can help you keep your house warm through the cold season, at a much lower cost.
The first thing on your list should always be proper maintenance of your heating equipment. Combine regular maintenance with recommended insulation, air sealing, and thermostat settings, and you could see a 30% savings on your energy bill.
It may seem silly, but adding another layer of clothing and putting on warmer socks can mean you are more willing to lower the thermostat in the winter. Not only will you save money on heating, but you’ll be prepared when you head outdoors.
Remember heat rises. So turn on your ceiling fan and set it to reverse. This will move the warmer air near the ceiling toward the lower level, and the living space. Running fans in reverse could save you around 10% on heating.
There’s no need to heat every single room in your house. Close the doors and vents in rooms you aren’t using. This will save you money and keep the rest of the house warmer.
Be sure the vents are open in the rooms you are using and make sure nothing is blocking the airflow, like furniture, dirty laundry, or other debris.
If you don’t plan on using your chimney, make sure the flue and draft are closed during the winter months. Open chimneys can draw the heat from your home. Fireplace inserts can help reduce heat loss.
Once you’re done using the oven, use the heat it has already produced, and open the door. This heat is normally wasted. Instead, open the oven door and allow the warm air into the rest of your kitchen.
The sun is a great source of light and heat, and best of all – it’s free. During the day, open your shades to allow the UV rays to heat your house.
If you can feel a draft of cold air seeping in from under your home’s doors, make a minimal investment in a draft blocker (usually around $10). They can help prevent the cold air from coming into the home.
Wrap hot water and radiator pipes, as well as ductwork, that runs through the house. Make sure you’re not losing heat as it travels through the house before it gets to the living spaces.
If you have radiators (or baseboard heating pipes) located on an external wall, place a piece of foil behind it to reflect the heat back into the home. You can do the same with ovens, wood stoves, and other sources of heat.
Hanging thicker curtains can protect your house from losing heat through the windows. Curtains with a thermal lining are a cheap investment and can save you in the long run. You can also use a blanket to line your existing curtains.
You can lose as much as 10% of your heat through uninsulated floors. Carpets and area rugs are a great way to reduce heat loss, while also keeping your feet nice and warm in the winter.
Seal any air that may be leaking out through cracks and gaps around windows by using caulk. It’s an inexpensive way to prevent heat loss.
It may be old school, but using a hot water bottle in bed at night can help you stay warm and also help you lower the thermostat.
During cold, winter months, change your sheets to flannel and use a down comforter. Both of these things will help you stay warm at night.
This one-time investment can pay off for years. Installing insulation in your attic or crawl space can help prevent heat loss and lower both your heating and cooling bills.
Investing in a programmable thermostat allows you to preset temperatures for when you’re home and when you’re away. After all, there’s no need to heat the house when you’re at work.
Remember, there are cheap and natural ways to keep your heating costs down during the winter season. Start the season out right and schedule routine maintenance of your heating equipment to ensure you’re maximizing your savings this winter.
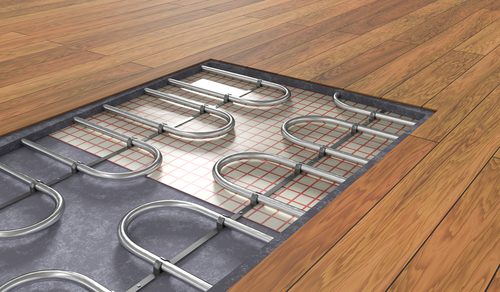 Radiant heating is growing in popularity because it’s a clean, quiet, efficient, dependable, and cost-effective way to heat your home in the winter. With radiant heating, heat comes from panels installed in floors, walls or ceilings. Steam or hot-water pipes are placed under the floor material, behind the walls or in the ceilings, delivering heat to the surrounding space, quietly and invisibly, in a constant, uniform way.
Believe it or not, radiant heating is one of the oldest forms of heating known to humankind. While the Romans are often given credit for creating radiant heat, in actuality, both archeology and research into ancient texts have proven that radiant heating came to be thousands of years before the Romans in Asia.
Thousands of years later, underfloor heating has evolved into one of the fastest-growing, most cost-effective and efficient ways to heat your house.
PM Engineer Magazine reports that radiant heating is growing in popularity each year in both new and retrofits across the U.S. And according to Scientific American, radiant systems transmit heat on average some 15 percent more efficiently than conventional radiators.
This article briefly explains what radiant heating is and what benefits it offers.
Radiant heating is a system of tubes that are installed under the floors, behind the walls or ceiling that are capable of warming up an entire house. The heat emitted by the tubing naturally radiates the room, warming all objects in it, including the floor, walls, ceiling, furniture and people. Radiant heating can also be installed outside your home, under the sidewalk or driveway to help melt ice and snow.
With radiant heating, panels are installed under a home’s floors, which heat up on command via electricity, hot water or air.
With electric radiant heating, electric cables are built into the floor, or a system using mats of electrically conductive plastic are installed on the subfloor. While this is a common radiant heating option for homeowners, it isn’t the most cost-effective due to the high cost of electricity.
Electric radiant floor heating only works if used in conjunction with a thick concrete floor to act as a significant thermal mass. This will help store the heat in the floor for a longer period of time.
Hydronic (liquid) radiant heat is the most popular and cost-effective heating system. With this type of radiant heat, tubing is installed in a pattern under the floor, and heated water is pumped from the home’s boiler through the tubing.
Newer hydronic systems allow for zoned heating, which controls the temperature in different parts of the house.
While less efficient than electric or hydronic systems, some radiant heating systems do use air heated panels. This type of radiant heating is usually combined with solar air heating systems. This type of radiant heating is not cost-effective for residential use.
In general, radiant floor heating can be used on any type of floor; hardwood, tile, carpet, and even concrete.
Radiant heating systems offer a ton of benefits to homeowners, including the following:
Radiant heating is more efficient than baseboard and forced-air heating because it eliminates duct losses. And, while traditional heaters are usually cranked to 149-167 Fahrenheit, floor radiant heating runs at 84 degrees Fahrenheit. For that reason, it consumes less energy.
Radiant heating systems are entirely quiet. Unlike forced-air systems, you won’t hear vents turning on and off all day, and no more clinging radiators either — just a silent, warm home.
People who suffer from allergies will appreciate radiant heat. No ductwork means that dust and other allergens won’t spread through air vents in your house, allowing you to breathe cleaner and easier.
Since warm air rises, radiant floor heating is the perfect way to deliver a consistent temperature throughout a home. The heat that the floors emit will travel upwards, thus warming the whole room to an even temperature.
Every time you turn up the thermostat in a forced-air heating system, your furnace sucks humidity out of your house. This can leave you with dry air, dry skin, and painful sinuses. Radiant heat will help humidity levels in your home.
Radiant heat is a flexible heating source as it can run off of: gas, oil, wood, solar and other sources or combinations thereof can feed radiant systems.
You don’t have to jump all in when it comes to adding radiant heat to your house. Instead, if you don’t want to install radiant heat throughout the house, you can choose to heat one or two rooms.
Radiant heating allows you to remove unsightly radiators and return vents on the floors and ceilings. With heated floors or walls, you can remove wall-mounted radiators and open the room up.
There is no need for ductwork for radiant heating to work properly. No ductwork means one less major thing to worry about during annual maintenance.
Radiant floor heating works with almost every single type of floor type: laminate, tile, wood, concrete, stone, and carpet.
Maybe the best perk of all, say goodbye to cold feet. Radiant heating means warm floors and warm feet around-the-clock, which is especially nice on those cold winter days when you’re stepping out of bed or out of the shower.
Households and commercial buildings account for nearly 40% of total U.S. energy use. As long as heating, cooling and lighting remain the single largest energy end-uses in a home, there will be an increased interest in finding and implementing energy-efficient building practices.
Radiant heating systems offer energy-efficient and cost-effective way to heat your home while saving hundreds of dollars on home heating bills.
 Humidity is the amount of water vapor in the air. When we think about humidity, we tend to associate it with hot days and how insufferable it can make the summertime. However, humidity isn’t just a seasonal nuisance that frizzes your hair and makes you sweat. Paying attention to how much or little moisture you have in your home is crucial to your health and your home.
Learn why monitoring your humidity is important, how to check your home’s level, and what steps you can take to regulate the water vapor for comfortable, safe living.
When temperatures drop in the winter, the moisture gets sucked out of the air. The moisture also gets sucked out of your skin and body, making it feel tight and dry.
Heating systems in your home worsen the problem because they cause the air to absorb any form of moisture they can. Often, that means anybody in your home becomes the sufferer.
Low humidity in the winter creates:
Low humidity can also inflame and dry out the mucous membrane lining in your respiratory tract, which increases the risk of a cold, flu, and other infections.
The effects of low moisture can also take a toll on the items in your home. If the air in your home craves moisture, you may start to notice the splitting of wood floors or chipping of paint from your walls, which are two common locations that hold onto water vapor.
High humidity during winter comes with a host of problems for your health and home as well.
With too much moisture in the air, you may notice:
Not only are these symptoms problematic to a homeowner because they will cost a pretty penny to repair, but they also come with another set of health issues to consider.
High humidity is the leading cause of mold and mildew growth in a home and can exacerbate — or create — asthma and allergy problems for your loved ones.
Too high, too low — what’s the right level? How do you know how much humidity is in your home?
To combat a home with too high or low humidity, keep your indoor humidity range between 40% and 60%.
There are a few ways you can check the level of humidity during winter in your home:
Not all homes’ HVAC systems have a form of built-in humidity control. If your system doesn’t, you’ll need to find a solution that helps balance the water vapor levels in your home.
A cheap, effective and quick fix is buying a portable humidifier. These can be purchased for under $50 and offer immediate relief for small, dry rooms.
If you need a fix for the entire area of your home, it may be best to invest in a whole-home humidifier. High-quality residential humidifiers connect directly to your home heating system and can control the humidity levels throughout the entire home.
Alternative options to a humidifier:
Keeping the water vapor levels consistent, and within the recommended range of 40% and 60% will keep you safe, comfortable and happy this winter season.
Looking for more tips to keep your home comfortable and efficient this winter? Check out these great resources:
 Winter is coming; is your house ready? We prepare ourselves for the winter by purchasing warmer clothes or installing snow tires on our vehicles, but many of us don’t think about preparing our homes as well.
Still, just like anything else, your house is affected by cold weather and snow. By working through this simple, nine-step home winterization checklist, you can help keep your home warm and safe while keeping your energy bills low.
Your first order of business, when getting ready for the impending cold snap, is to ensure you’ll have heat when the chill arrives.
If you haven’t run your heating system in a while, turn it on to make sure everything is functioning correctly. Additionally, it’s wise to:
If you feel drafts in your home, your money could be going right out of the window – literally. Drafty windows and doors allow heated air to escape your home and cold air to enter it, which can increase your monthly heating bill by up to 25%.
To block drafts from coming through your windows and doors, consider adding the following material to door and window frames:
Some homeowners also use insulated curtains as extra reinforcement for window drafts.
If you’re unsure where the leaks are coming from, an energy audit can identify where leaks are occurring, and professionals can properly seal them in a matter of minutes.
Have you taken proper measures to protect your air conditioner against the harsh winter?
Cleaning and covering the condensing unit staves off the damage that can be done by wet leaves and debris which can accelerate rusting or cause freezing in your AC unit’s internal components.
Protecting your equipment means that when warmer months come around, your AC will be functioning properly.
If your roof shows signs of aging, not only will your heating bills increase this winter, but you may also be prone to leaks and water damage that can set you back some serious cash in repairs.
To see if your roof is winter-ready, check for:
If anything looks awry, have repairs made immediately to secure your home for heavy snowfall.
Take the time to remove all of the screen windows and doors in your house and replace them with storm windows and doors.
Besides adding a layer of insulation, and helping reduce air leaks, storm windows help protect your primary windows from winter elements, which screen windows would allow in.
If the power goes out in the middle of winter, it’s critical to be prepared to protect your family and your home. Many Northeasterners invest in a generator for a backup power supply in case the storms get too intense.
Before winter strikes, test your equipment to make sure it’s functioning when you need it most. If you haven’t in a while, give your equipment routine maintenance.
For more tips, read six ways to maintain your generator.
If your home has a fireplace, you should get your chimney inspected annually. In addition to the energy benefits it offers, it is crucial for your family’s safety. Every year, 25,000 homes across the country suffer from fires due to poor chimney maintenance.
As a member of the National Chimney Sweep Guild, Santa Energy can clean your chimney and inspect it for potential obstructions. We also check the chimney draft to ensure the chimney will draw up the fire and smoke properly and inspect the brick inside your chimney for gaps and exposed walls that are susceptible to danger from rogue sparks.
Protect your pipes from freezing this winter by insulating exposed piping, both inside and outside your home. Don’t overlook piping in your attic, basement, or crawl spaces that aren’t visible to you day-to-day.
To insulate the piping, wrap them with electrical heating tape first, then foam insulating sleeves (or more industrial material) to protect them from the winter weather.
If you plan to leave your home for the winter for an extended period of time, it’s always wise to consider shutting off your water altogether to avoid and costly mishaps from frozen pipes or water damage.
Additionally, if you have a sprinkler system at your home, make sure to also blow the water out of their pipes as well to reduce cracking in your system.
There are several small adjustments you can make to your day-to-day habits and home upkeep that will decrease your energy bills, even more, this winter. For example:
For more recommendations to optimize your home’s energy, or for more winterization tips, consider the following resources: