 Tankless water heaters — which are also known as instant water heaters — warm water with high-powered gas burners or electric coils. This process creates hot water rapidly and delivers it directly to your faucets or shower, on-demand. This system varies from traditional water heater tanks, which stores warm water in an insulated tank and reheats it as needed, slowing the heating process.
These unique processes mean homeowners will find differences in everything from overall cost to safety between the two systems. If you’re asking yourself “are tankless water heaters worth it,” read this comprehensive list of tankless water heater pros and cons and decide if a tankless water heater is the best solution for your home.
Advantages: The most attractive feature for tankless water heaters its ability to cut energy costs for homeowners. This is particularly desirable as heating water is usually the second highest utility bill for homeowners in the U.S., being beaten only by the heating and cooling of a house itself.
Consumer Reports states tankless water heaters are roughly 22% more efficient than water heaters with tanks. This equates to nearly $150 off your energy bill each year. Furthermore, propane-powered tankless water heaters emit approximately 50% less CO2 emissions than water heater tanks, which will help reduce your carbon footprint.
Drawbacks: Unfortunately, energy efficiency may come at the cost of lifestyle efficiency when it comes to tankless water heaters. Because of their size, and instant heating techniques, tankless water heaters don’t hold enough hot water for cross-over usage. For example, if you were running the dishwasher and showering at the same time, you might run out of hot water. Actually, Consumer Reports states that inconsistent water temperature is one of the biggest buyer complaints when it comes to tankless water heaters.
Advantages: Tankless water heaters lifespan can reach as high as 20 years compared to only 10 years for a tank. By reducing your monthly bills, and decreasing the number of tanks you’ll purchase over your time as a homeowner, a tankless water heater might be a more cost-effective investment.
Drawbacks: Tankless water heaters require special attention to maximize their lifespan. For example, without a proper setup for a tankless heater, your HVAC contractor will need to:
This allows for proper installation of your water heater to ensure long-lasting performance for years to come.
Additionally, homeowner’s will often be on the hook for additional components, like water softeners, to optimize their tankless water heater and ensure the tank functions properly for the long-term.
Advantages: Because tankless water heaters are both more efficient, and have a longer lifespan than traditional water heaters, homeowners may eventually find the return on investment a favorable one. If a tankless water heater saved you $150 on your energy bills for 20 years, you’d wind up saving $3,000 on bills alone. And, because water heater tanks need to be replacements twice as often, the total savings on equipment over the years may also add up quickly.
Drawbacks: Without installation costs, tankless water heater and traditional tanks are comparable to one another in price. However, because installing a tankless water heater requires specialized service, it makes a tankless water heater far more expensive — upfront — than a traditional water heater.
Consider comprehensive pricing, which includes:
Combining these factors, you can expect to pay an average of $1,500 to install a tank water heater. A tankless water heater, on the other hand, will cost an average of $3,971.
As with many home projects, determining if a tank or tankless system is right for you depends on your situation.
How large is your home? Insulated tanks typically hold 30-50 gallons of water, making them quite a large appliance for your home. Tankless water heaters are smaller, which make them easier to store in small homes.
How many inhabitants are in your home? Tankless water heaters are beneficial in homes that use a limited amount of hot water, like vacation homes that aren’t a primary residence. So, a tankless water heater may not be the best solution for a family of four, who all competes to get ready in the morning.
How often are you home? Tankless water heaters are slightly safer than traditional tanks, because the only run when hot water is needed – as opposed to water tanks that are permanently on.

(Photo by Gustavo Quepón on Unsplash)
Actually, there are several drawbacks to natural gas, that have homeowners considering alternative fuel sources for their primary energy. For example:
To find a safer, more cost-effective and more environmentally-friendly fuel sources, homeowners are increasingly considering the following four types of fuel.
Propane, which comes from both natural gas processing and crude oil refining, is the most common alternative to natural gas. Propane is abundant, and also, when compared to natural gas, is a more cost-effective and efficient option. Even though consumers pay a higher price per unit for propane ($26.99 per gallon) than natural gas ($6.23 per cubic foot) by volume, one cubic foot of propane equals 2,516 BTUs, while one cubic foot of natural gas equals 1,030 BTUs. This means propane provides more than twice the energy of natural gas, which makes it a far less expensive alternative to natural gas because you get more for your buck.
Though propane is a flammable substance and should be handled carefully, it’s not common for propane tanks to explode. Propane tanks are rarely connected or used in gas pipelines, which make this energy source less risky than natural gas. In comparison, natural gas lines pose a greater threat to leaking and causing potentially deadly accidents. Take, for instance, the 2010 PG&E natural gas explosion in San Bruno, Ca that left eight people dead.
Just like natural gas, propane is best used for everyday appliances like:
Propane is also an excellent fuel source for outdoor cooking as die-hard barbequers prefer the taste of food cooked over a propane grill to one fueled by natural gas.
If you’re looking for a cost-effective and familiar alternative to heat your everyday uses, propane is a good choice to replace natural gas.
Many homeowners are hesitant to install solar in their home because the upfront costs feel extreme. At the time this article was written, the average nationwide solar panel cost is $3.05 per watt. And, the average solar panel system size in the U.S is around 6 kilowatts (6000 watts). That means outfitting a home with solar will cost about $18,300. Even with the 30 percent tax credit the U.S. government offers, homeowners can still expect to pay roughly $12,810 for new equipment. The installation costs are similar to installing a natural gas pipeline into your home.
Solar power is energy derived from the sun then is converted into electric or thermal energy. Because of this process, the Solar Energy Industries Association, claims it is one of cleanest and most bountiful renewable energy source available. And while solar is much more eco-friendly and safe than natural gas, it’s worth mentioning solar panels pose small safety hazards and risks for technicians constructing, installing, and maintaining the panels, according to the U.S. Occupational Safety and Health Administration.
Solar energy is versatile in its many uses and is used to generate electricity, provide lighting, and water heating. However, if you have many utilities powered by gas, solar energy may not be your best alternative, as there is no gaseous form of solar power.
Compared to natural gas, solar power is cleaner, safer, and cheaper and can be a great source of electricity. However, the upfront costs to install new equipment may deter many homeowners from converting to solar.
Biomass is an attractive fuel source because it’s renewable and easy to grow. Still, even for an easily accessed fuel, when compared to natural gas, biomass is a bit more expensive for residential use. Small-scale biomass electric plants have calculated the cost of biomass energy can reach $0.15 per kilowatt-hour (kWh), whereas natural gas is around $0.12. Though the difference is pennies, the costs will add up over the year. For example, a single, 500-watt halogen lightbulb, that you use for .25 hours a day, every day will cost you roughly $6.84 per year with biomass $5.48 per year with natural gas.
Biomass is a low carbon, low emission fuel, which is great for the environment. However, there have been concerns about biomass’ effect on human health. In 2016, numerous health organizations wrote a letter to Congress denoting that biomass negatively impacts human health, and contributes to asthma attacks, cancer, heart attacks, and poorer quality of health. The jury is still out on the overall safety of biomass, makes many homeowners reluctant to introduce it in their home.
If you are in search of a gaseous replacement for natural gas, biomass is an option. Specifically, biomass is a great alternative if you live in a rural area and it’s difficult to access natural gas or propane. Biomass can heat appliances and act as a portable cooking source if you’re a camper. Furthermore, biomass can also great for power generators and mechanical engines.
Depending on your geographic location, biomass may be a viable alternative for natural gas. However, its potential health risks may make it a riskier choice than other options on the market.
For those with access to a company selling wind energy, the cost of this alternative fuel is unbeatable. The current price per kilowatt hour averages a mere $0.02, compared to natural gas’ $6.23 per unit price. However, if you’re unable to purchase energy from a company, you’ll need a wind turbine that converts 100 kilowatts of energy to power your home, and that’s an expensive investment. Specifically, the initial cost and preparation of installing wind turbines can range from $50,000 to $80,000. Not to mention the space required to house such a large piece of equipment.
Wind energy is a clean and renewable energy source. It does not pollute toxins into the air or contribute to greenhouse gases as natural gas does. However, like solar energy, wind turbines do pose a safety threat to maintenance and installation workers. Wind turbines also have led to the increase in bird and bat deaths due to the aerial space they occupy, which has pushed some groups to work toward the creation of ‘no-blade’ turbines.
Wind energy is versatile and can produce both mechanical energy and electricity. That means, it’s great for all aspects of residential and commercial energy — from heating and cooling to everyday appliances.
When it comes to wind energy, if you have access to an energy company that provides the resource, or space, money, and proper climate to install your own wind turbines, it could have huge returns on your investment.
Other alternative fuels are on the horizon as well. For instance, syngas, which is typically reserved gas-fueled engines and generators, has started to become a viable replacement for the generation of heat and power on a small scale. Though the cost of syngas directly correlates to the prices of natural gas, it could eventually become a cost-effective way for homeowners to fuel their appliances.
At the end of the day, the alternate fuel you select will depend on your preferences and accessibility to new options.
 Are you thinking about installing an air conditioner? If so, it’s probably been a while since you’ve last researched AC technology. Perhaps you’ve never done it before. The process may feel overwhelming to you — but fear not. We’ve created the following guide so you know what questions to ask to ensure you’re selecting the right equipment, the best HVAC company, and what steps you can take to achieve ongoing satisfaction with your new central air conditioner.
Before purchasing a new central air conditioner, ask yourself a few questions:
A BTU is a measurement used to determine heating and cooling efficiency in household appliances, like air conditioners. In other words, you need to know how much power your new central AC should have to keep your home cool but still efficient. To determine how much energy your new central AC should have, you can use the Manual J Load calculation. This calculation helps you pinpoint the heating and cooling capacity your HVAC equipment should have. There are several online resources to help figure out your needs based on your home dimensions, like LoadCalc and the CoolCalc.
Your geographic location and the climate will also play a role in the type of AC unit you should purchase. Specifically, your location will impact the Seasonal Energy Efficiency Ratio (SEER) rating you need for your new AC unit. The SEER rating measures how efficiently your AC unit pumps out cool air. We’ve seen SEER ratings as high as 25, but in most cases, you’ll need 14 SEER or less. However, if you live in an extremely warm or desert climate, you might consider a 16 SEER.
The average lifespan of an AC unit is between 10 and 15 years, and if it’s been that long since you last shopped around, you may be surprised at how much AC technology has evolved, and what the new advancements can do for your overall energy bill. Newer, high-efficiency air conditioners could reduce energy use for air conditioning by 20% to 50%. For find a high-efficiency AC, look for ENERGY STAR certified equipment, as these products are specifically designed to save energy and lower your energy bills.
If you’re looking to save money, it might sound counterintuitive to tack on another purchase, but often when you bundle an AC with a new furnace HVAC companies will cut you a deal. It’s also a smart investment as mixing two systems — like an older furnace and a new air conditioner — can decrease the overall productivity of your systems.
Now that you’ve defined what you’re looking for in an AC unit, you’ll need to find a company who can deliver on your needs. Finding a suitable HVAC company is perhaps the most essential part of the equation because the ongoing maintenance of your equipment may depend on it. Apart from shopping around for the best prices, consider the following questions to ask an HVAC contractor.
First and foremost, does the HVAC company you’re considering have energy efficient equipment that matches the BTU and SEER ratings you need?
When determining the HVAC company you work with, you’ll want reassurance that the job will be done right. Make sure that the company you work with has state-licensed technicians and don’t use subcontractors.
A new AC unit is a significant investment. To get the most out of your money, ask your HVAC company how they’ll guarantee your equipment. For example, is there a warranty? And, post-installation, will the HVAC company include annual servicing plans? You can also ask if the HVAC company offers financing so you can break up the financial commitment of a new central AC unit.
Double check that the HVAC company doesn’t have a waiting list, especially if you’re purchasing your AC unit for an immediate need.
Will the HVAC company handle all of the necessary permits and approvals with the local authorities? Will they help you dispose of your old unit? And, will they clean up their work area (ductwork, walls, flooring) after finishing the job?
The HVAC company you work with should walk you through the installation process, but to know they’ve done an excellent job, consider the following:
This step ensures your unit is level. Without a level AC, the machine can’t correctly distribute fluids that allow the AC’s compressor run.
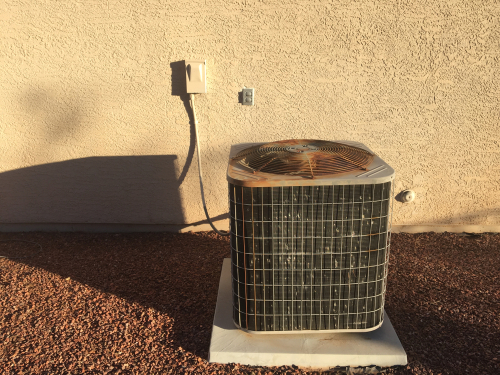
For example, the outdoor unit for your AC should be at least 1 foot away from the house. There may be other state or local ordinances that your HVAC company should adhere to as well.
Your AC unit will have a copper piping that aids the flow of the AC’s refrigerant. Take a quick look to ensure the copper line running from the outdoor unit to the indoor unit is well taken care of. If done correctly, the piping should be insulated, with additional supports every four feet, and the line should be as short as possible.
If your agreement indicated clean up, make sure the technicians have cleared scraps of trash from the installation area. And, if they promised to take your old unit, ensure they’ve done so.
Before your HVAC contractors leave, run the system through a complete cooling cycle to ensure it works properly. Check the levels of refrigerant as well to verify they’ve left a sufficient amount.
By selecting the correct equipment for your home, and working with an HVAC company you can trust with the installation process and on-going maintenance of your new piece of equipment, you’ll be able to enjoy your new central air conditioner years to come.
When it comes to entertaining guests or gathering your family together, nothing feels cozier than nestling around an outdoor kitchen. And, by building one on your own, you can not only make that dream come true but also save a boatload of money.
If you’re researching DIY outdoor kitchen spaces, here are the three ‘F’s’ for you to consider: Frame, finish and fuel.
When building a DIY outdoor kitchen, you’ll start with the frame. Before determining the type of structure you want to build, consider the durability of the materials, what level of difficulty the material is to work with, the tools you’ll need for proper assembly, and the overall cost for a frame.
Here are three different options for frames, and the benefits and drawbacks of each of them.
Benefits of Using a Wood Frame
Wood is the most cost-effective framing option (at least initially, more on this later). Pressure-treated pine is the most common option for outdoor kitchens. This option ranges in price from $3-$10 per square foot, depending on the quality and your geographic location.
Wood is also easy to work with, which means a frame can be assembled by someone with little to no building experience. Lastly, it’s simple to add backing to a wood frame, allowing you to add accent designs and finishes, like stone, tile or granite to get the final look you want.
Disadvantages of Using a Wood Frame
Keep in mind, wood is meant to burn. That means, if you use wood for your DIY outdoor kitchen, you’ll need to add fire resistant coating and an insulated jacket to decrease the risk of fire. Though wood is inexpensive upfront, the upkeep can become costly. Wood is more susceptible to damage. To start, bugs and insects can eat away at the wood. Mother Nature can be rough on wood, too. Without the proper coating, wood can rot, making for a less stable outdoor kitchen over the years.
Benefits of Using a Brick Frame
Brick is a classic look, made from durable material, and is one of the most popular styles for an outdoor kitchen. Because brick is a timeless style, you don’t need to add materials to make the outer-facing wall more attractive, the framing can blend nicely into the beautiful exterior. Unlike wood, brick is weather and fire resistant, making it a safer long-term investment.
Disadvantages of Using a Brick Frame
Because it’s quality material, you can expect to pay more for brick than wood (ranging between $1-7 per square foot). To assemble a brick frame, you’ll also need more tools than if you worked with wood. For example, a trowel and level will be required to build your kitchen. As you might guess, brick and cinder blocks are more complicated to work with than wood, which means you’ll need some experience to assemble a frame with these materials.
Benefits of Using a Steel Frame
Steel is one of the most durable materials you can use for a DIY outdoor kitchen as it can hold up against a wide range of weather elements. Because steel is an incredibly sturdy material, you can do more with less. In other words, when designed correctly, a steel frame can provide the support you need with a minimal amount of material for the frame. Steel ranges from $67 – $95 per square foot, which seems expensive, but because you can use less of it to build, it can be a cost-effective method for building, especially compared to brick.
Additionally, steel is renewable and recyclable, making it an eco-friendly material.
Disadvantages of Using a Steel Frame
Unfortunately, working with steel is not for beginners. Of all the materials listed above, steel is the most difficult to work with. To assemble, you’ll need to rivet and bolt the material to a concrete slab, which requires both expertise and specialized tools. Finally, if you live in a humid area, steel can get very moist and will eventually corrode, so you’ll also need to add special coatings of anti-corrosives during construction.
After completing your frame, it’s time to select finishes. If you use a wooden frame, it’s wise to add water-and-mold-resistant concrete boards to the frame to support the structure and also provides you a foundation to add decorative panels like stucco, tile, and stone.
But, regardless of your frame, here are some of the most popular finishes for well-designed DIY outdoor kitchens.
Granite is an excellent option for a sleek contemporary finish and goes well with wood. However, it’s important to note that granite is more prone to staining than the other finishing options listed below.
Price Range: $45 – $200 per square foot
Stainless steel is known for its durability, which means your outdoor kitchen will last a long time. And, stainless steel is easy to clean and maintain.
Price Range: $67 – $95 per square foot
Stucco is a great option for a finish because it’s inexpensive, naturally resistant to fire, and is a durable material that requires little maintenance. However, if you live in a particularly wet climate, moisture can be a problem for stucco.
Price Range: $6 – $9 per square foot
Stone looks great on an outdoor kitchen because it easily blends into the natural elements surrounding your home. However, stone can be challenging to work with, so if you want a stone finish in your outdoor kitchen, it might be best to work with a professional. While real stone veneers can be pricey, manufactured stone is a great alternative as it looks the same, but can be purchased at a fraction of the cost.
Price Range: $12-$ 17 per square foot
Tile is a nice choice for crafty DIYers who want a wide variety of colors and style to play with. However, tiles are fragile, so you might think twice about adorning your outdoor kitchen with this material if you live in an area will extreme climate switches.
Price Range: $2-$7 per square foot
Concrete is a great way to add a modern finish to your outdoor kitchen. It’s cost-effective and visually appealing but will require a bit of extra maintenance. Concrete should be sealed and resealed annually to prevent cracking.
Price Range: $1-$2 per square foot
Once your frame has been built, and finishes have been added, you’ll need to add fuel to your outdoor kitchen. The most comprehensive fueling options for outdoor kitchens are natural gas and propane.
Though both fuels are eco-friendly, propane has a few benefits you should consider:
Not to mention, die-hard grillers know that a propane grill makes for a better taste to your food as well.
Are you ready to start building? Here are some great resources we’ve found to help you get started:

(Photo/Pexels)
To enjoy the benefits of propane, you must equip your home with a propane tank. To ensure you’re storing and securing your propane tank adequately, federal, state and local ordinances govern installing, dispensing and refilling propane tanks properly.
Follow this guide to discover what you need to know about the policies regulating your home’s propane tank.
The primary considerations you should know are how far a propane tank needs to be away from houses, buildings, driveways, awnings, and property lines to ensure legal and safe placement of your above or underground propane tank.
These placement regulations will vary based on the size of your propane tank.
These tanks are most often used to power cooking ranges, indoor fireplaces, or other small appliances. They are also portable. Still, when placing a 100-pound propane tank on your property, you must adhere to the following requirements:
A 100-gallon propane tank does well with equipment that requires substantial power but isn’t used every day. For example, you may use it for an emergency generator or heating outdoor swimming pools. When placing a 100-gallon propane tank on your property, keep these measurements in mind:
Additionally, four (or fewer) 100-gallon tanks can be placed next to each other on a single property as long as placement restrictions are adhered to.
This size tank is the most common for residential propane use as it’s suitable for home heating, running everyday appliances, powering generators, and more. With a larger tank, you won’t need to bother with as many refills, but need to adhere to additional requirements during installation:
If you have a large home, like over 4,500 square feet, a 1000-gallon propane tank is your best bet for keeping your home heat running and your everyday appliances in operation. 1,000-gallon tanks are also common for agricultural purposes. For this size tank, distance measurements are as follows:
If two, 1000-gallon tanks are placed within 3 feet of each other, each of the above clearance requirements increases to 25 feet.
If these numbers seem confusing, don’t fret. Top propane companies and professionals will know, and explain the propane tank distance requirements you must abide by when installing a propane tank on your property.
In addition to clearance requirements, underground tanks need to adhere to depth guidelines, which are defined in the LP Gas Code (NFPA 58). These measurements are as follows:
Before the propane tank installation process, you’ll need to consider the clearance and depth guidelines.
The answers to these questions will inevitably help you decide the best placement of your propane tank.
But, you’ll also need to factor in other systems in your home so when it comes time installation, you don’t disturb existing work:
Once the installation of your propane tank is complete, the safety protocols continue. Specifically, upon each refill, your propane tank will need to be inspected for rusting, pitting, and structural integrity. In Connecticut, it may also be required to conduct survey readings, records audited and spot checks for new construction.
It’s best to work with a propane company who knows your state and county ordinances so that you can ensure proper installation and ongoing use of your propane tank.
 We’re often asked how long an air conditioner’s lifespan is, though the answer isn’t cut and dry. According to the Energy Department, the average AC unit will last roughly 10-15 years. However, the actual longevity of your AC unit will depend on several factors only you can determine.
For a look at the possible lifespan of your AC, consider your personal habits.
Wear and tear will play a role in how long your AC unit lasts. While the average homeowner would need to replace their unit every 10-15 years, someone who rarely uses their AC might be able to wait for 20 or more years before replacing their AC.
Tip: To improve your AC lifespan?, reduce your usage. Remember to turn it off when you’re away, or resist the temptation to turn it on during moderately warm days.
Humidity will cause your AC unit to work on overdrive even if it’s not cooling your home. The humidity will trick your AC unit into keeping the fan on because the coils inside will do their part to absorb the moisture from the air. This extra strain on your coils and fan can decrease your AC’s lifespan.
Tip: You can take steps to minimize humidity in your home by purchasing a dehumidifier, or growing plants that reduce moisture in the air like Boston Ferns, Palms, or Cacti.
The cooler you run your AC, the more strain you are putting on it, especially if you forget to give it a break. Not only does frigid air force your unit to work harder, but it also increases your bills. According to the Department of Energy, 78 degrees Fahrenheit is the most efficient temperature to run your AC when you’re home, and you should increase it to 85 degrees or off while you’re away. Adversely, adjusting your thermostat to just 72 degrees can increase your bills by roughly 47 percent.
Tip: By nudging the temperature up just a couple of degrees, you will be putting less strain on your AC, and effectively increase its lifespan while decreasing your bills.
Debris on coils, ductwork, or other components of an AC can cause it to malfunction due to a lack of airflow. Specifically, with an interruption of proper airflow, your AC can freeze up. And, if this happens, and isn’t caught early enough, the frozen unit can cause water damage your AC, reducing its lifespan.
Tip: Every two-three months, give your AC a routine checkup. Change the air filters, wipe debris from the coils, and check your ductwork to make sure nothing has collapsed or loosened. A clean unit makes for a longer-lasting system.
The better you take care of your AC unit, the longer it will last. Scheduling preventative maintenance with your local HVAC company can help extend your AC’s lifespan, and ensure it’s operating at maximum efficiency, which can also help reduce your monthly bills.
Tip: Industry experts agree that a bi-annual checkup — performed by professionals — for your AC unit is best practice to maintaining a long-lasting system.
The older your AC unit gets, the less efficient it can become. In fact, there is a measurement to help you gauge your lost efficiency called The SEER (seasonal energy efficiency ratio). Each year that passes, your AC unit can lose up to 9 percent efficiency. And, every decrease in percentage points means an increase in your energy bills.
Without proper maintenance to your AC unit over the years, it’s possible for mold and mildew to grow in the ductwork. This is harmful to the air you breathe, and also indicates that your AC is weathering damage. A burnt scent indicates issues with your wire insulation — another indication that your AC unit is aging. If you can smell your AC, then it isn’t operating well; start by giving it a good clean. If the smells don’t go away, consult an expert to see if your AC needs an update or an upgrade.
When your AC unit makes noises like a squeal, grind, or grating noise, it doesn’t take a rocket scientist to realize something is not right. These noises may indicate a simple fix, but can often require more technical maintenance. If your AC unit is making strange noises that you’d can’t quickly identify, it’s time to call in an expert.
Leaks from your air conditioner come from two primary sources: refrigerant leaks and leaks from the condensate line. Both instances are caused by faulty components in your AC unit where parts are either broken or blocked, which can be a sign of aging. It can also be a sign of danger. Refrigerant leaks can be harmful to you and your family due to the toxicity of freon in the refrigerant. And, in both scenarios, without proper detection of a leak, mold can grow in the leakage, which is harmful to breathe. Ongoing maintenance can help with prevention and early detection of leaks. Additionally, if you spot a leak, call an expert to help you rectify the situation immediately.
After diagnosing an issue with your AC unit, you may take steps to repair it yourself, or you might seek advice from an expert. Whichever route you choose, make sure to conduct a full inspection of the unit.
A comprehensive AC inspection includes:
After a thorough inspection, you and your technician should have a full picture of the severity of your AC issues. This is how you can decide if it’s more cost-effective to repair or replace your system.
Luckily, technology has evolved in a way that makes our HVAC equipment last longer than ever, and perform more efficiently than equipment of the past. In fact, the most efficient, modern air conditioners use 20 to 40 percent less energy than models made in the early 2000s. So, when it comes time to replace your outdated technology, it can actually be an opportunity for cost-savings for you as a homeowner.
(Photo/Pixabay)
Follow this guide to identify why your AC unit is frozen, and how you can fix it.
Regardless of if you have a window AC unit or a central air conditioner, the reasons behind your AC freezing up are likely the same, as are the solutions for fixing it.
The root cause for your AC freezing up is usually the manipulation of the Joule-Thomson Effect, which is the principle of thermodynamics that allowed us to create an air conditioning unit in the first place.
Stick with us, we won’t get too technical here.
The Joule-Thomspon Effect
The Joule-Thomson Effect is a theory that describes how the flow of gas and pressure work together. In short, the method says that if gas expands, then pressure and temperature will decrease as a result (and vice versa). This is important because your air conditioner works by the evaporator coil expanding refrigerant (the liquid agents that make your AC work) to absorb heat in your home, and then pushing cool air out as a result.
So, your air conditioning unit expands refrigerant and decreases the temperature, sometimes causing it to malfunction, and a frozen AC unit is the result.
Though the process seems complex, the common causes are quite simple.
When caught early, fixing your frozen AC unit is often a simple solution. Follow the steps below to determine the issue so you can take action.
If your AC unit is frozen, take steps to unthaw the unit and let the coils dry. To do this, simply switch your thermostat to ‘off’ and your fan to ‘on.’ This will minimize further damage and let you get a better view of what’s happening to your machine.
If you’re unable to diagnose why your air conditioner is freezing up, or if you notice issues like a leak that requires specialized attention, be sure to consult with an AC professional.
Not only will the pros be able to accurately assess the issues, but they will also be able to provide you an estimate for repairs or help you upgrade to a newer unit, which might be more energy efficient. They’ll help you determine how your return on investment will look over time. This will help you make an informed decision about how to move forward.
It’s also wise for homeowners to schedule professional tune-ups on all heating and cooling equipment in your home to decrease significant issues that could cause you to replace your home appliances prematurely, and also ensures your systems are effectively functioning, which can reduce your bills.
For homeowners in the Fairfield and New Haven Counties in Connecticut, Santa Energy has been a reliable HVAC company for over 75 years. If you have any issues with your air conditioning unit that you’re unable to solve, we’re happy to help.
 Deciding between propane vs. electric for energizing a home is a debate common for homeowners who want to be both cost-effective and energy-efficient. Though the two energy sources are comparable in many ways, they are distinct in others as well.
To start, propane is a primary energy source, whereas electricity is secondary, that is to say, propane can be used ‘as is’ and electricity can only be used once it’s been created by another energy source. This means that it takes more energy to create electricity, which can affect its cleanliness, efficiency and cost. But, how do these variables compare to propane, which your house may or may not already be equipped to utilize?
Below, we compare propane vs. electric to see which is the better source of energy for your home.
To determine the different price points of propane vs. electricity, we first need to do a bit of math.
Propane and electricity are measured in different units:
However, both fuels are calculated on a per hour basis for efficiency and energy consumption, which helps as we convert total energy usage by appliances.
To get both sources of energy on an even calculation playing field, remember these statements:
We’ll use these conversions in a moment to calculate which energy source you should be using in your home.
Determining whether propane is cheaper than electricity depends on several variables like the age of appliances your home operates on and the cost of fuel and electricity in your area. But, in this section, we’ll cover how you can calculate the total cost of both energy sources, and show you how energy-efficient appliances can impact your total costs.
Comparing the cost of propane to electric head-to-head, is simple.
Which is less expensive?
Let’s do an example together:
So in this case, electricity is less expensive than propane by volume because $2.70 is less than $2.94.
The math gets a little more complex when putting the cost up against energy efficiency. Propane is considered an efficient fuel, which means it holds more energy per volume than other sources, which can reduce its overall usage cost.
Let’s review how appliances stack up when it comes to costs comparisons of propane and electricity.
A 100-watt light bulb will consume 1.2 kWh, per day. With propane, it would take roughly .024 gallons (341.21 BTUs/hr.) to light the same lightbulb.
Using the data points we discussed, lighting your home for 12 hours would cost:
Propane is the more cost-effective fuel in this scenario.
If you run a 1300-watt washing machine for 3 hours a day, you can expect to use 3.9 kWh, per day. The same machine would take 0.106 gallons (4435.78 BTUs/hr.).
Using the data points above, using a washing machine for 3 hours costs:
Propane is the more cost-effective fuel in this scenario.
If you run a 2,500-watt heater for 8 hours a day, you can expect to use 20 kWh, per day. The same machine would take 0.068 gallons (8530.3540825 BTUs/hr.).
Using the data points above, using a heater for 8 hours costs:
Propane is the more cost-effective fuel in this scenario, and as you can see, the cost gap between the two energy sources is growing with higher voltage appliances.
Propane is a non-toxic, non-poisonous fuel that burns cleaner than other fuels and produces environmentally-friendly emissions. Additionally, propane will not create an environmental hazard if spilled. For this reason, it’s possible for homeowners to have either an above-ground or underground propane tank without any worry of contamination.
While electricity has zero emissions, that doesn’t mean it’s 100% efficient. Because electricity is a second energy source, as we mentioned earlier, the primary source of energy may be less environmentally-friendly.
In fact, according to The U.S. National Library of Medicine, about 62.7% of electricity generated is from fossil fuels (coal, natural gas, and petroleum), and 30.1% is attributed to coal. And, coal mining accounts for roughly 9% of total U.S. methane emissions and nearly 1% of total U.S. greenhouse gas emissions, according to EIA, which is not environmentally-friendly.
Determining which energy source is best for you will depend on other factors apart from fuel efficiency and environmental impacts. It also depends on its availability in your region, the cost to equip your home for the energy, and your personal preferences.
If you are already equipped with an electric water heater, it might not make sense to convert to propane. Most homeowners save between $150-$200 a year with a propane water heater versus an electric one, but the cost of a new propane water heater could offset the savings for the first couple of years. However, if you purchase high-quality equipment, the cost-savings of switching to a propane water heater will eventually win out.
In short, propane is the most energy efficient of the two grills — and might be better for the taste of your food as well. Most electric grills can cook around 400 degrees, however, they aren’t typically designed to stay at high heats for long periods of time. So, quick meals on an electric grill works, but you may have an overall better experience using a propane option.
Some states give massive rebates to homes that switch from oil to natural heating solutions like electric, which can offset the margin cost differences, and wind up saving you more money in the long-run. There are often stipulations that come with the rebates though, so it’s wise to do your research to see if the options provided by the state make sense for your home. Further, not all regions of the United States have accessibility to both energy sources. Where you live might make your decision for you.
Apart from occasional check-ups to ensure your wiring, circuit breakers, outlets, and plugs are in working order, electric homes have little maintenance to adhere to. Propane requires a bit more observation, as the fuel will run out and the homeowner will need to reorder their supply. Luckily, many propane delivery services will monitor your fuel levels, and schedule automatic deliveries to help reduce the burden of fuel delivery.
Costs vary by region and by the household for both propane and electricity. Historically, propane has given consumers more bang for their buck when compared to electricity, but everyone’s situation will be different. If you want to find out more about propane vs. electricity for your home, contact an expert.

(Photo/Unsplash)
Not having enough propane on hand can be both a burden and a danger. From running out of fuel during the middle of a cookout to not having heating oil on a cold winter’s night, it’s important to know the specifics of propane tank maintenance, how quickly the fuel burns, and how to tell if you’re running low on fuel.
Residential propane tanks range in size from 100-1,000 gallons. Smaller tanks, like 20-pound tanks, are sold for modest needs like outdoor barbecuing or small appliances like fireplaces.
Homes 2,500 square feet or larger, that have multiple appliances running on propane, will most likely use a 500-gallon tank. Propane tanks any larger than 500-gallons are often reserved for commercial use.
How you put your propane to use will play a role in how long your fuel source will last. Consider the most common uses for propane:
As mentioned above, 20-pound propane tanks are used for modest tasks like cooking individual meals. As a rule of thumb, one tank of propane will typically last between 18-20 hours if you’re grilling on a medium-sized grill. Whereas larger grills can burn through 20-pounds of propane in as little as 10 hours.
On average, you’ll use one or two pounds of fuel per meal if you use a medium-sized grill on high heat. That equals roughly 8 grilling sessions per tank.
British Thermal Unit, or BTUs, is the industry standard used to measure the heating efficiency of household appliances. The average home furnace runs on roughly 100,000 BTUs, and one gallon of propane equals 92,000 BTUs. That means the average home furnace burns roughly one gallon of propane per hour.
In this example, a home furnace will burn anywhere from 500-1,200 gallons of propane per year, depending on how often you turn on your furnace.
Your hot water heater usage will vary based on how many bathrooms you have in your home, and how many people are in and out of your home. As a rule of thumb, the average home uses about 1.5 gallons of propane a day for typical hot water heating use.
The average homeowner can expect to use somewhere between 200-300 gallons of propane per year for hot water.
Overall, the average homeowner will use roughly 2.5, 500-gallon tanks of propane each year for home heating and cooking.
For even more customized calculations, you can follow the steps below:
Propane doesn’t expire. So, with its long shelf-life, the only reason you’ll need to order more propane is when you’re running low. Unless your propane delivery service provider monitors your fuel level and delivers to you automatically, you’ll need to learn how to read the gauge on your propane tank.
The most important number to know when reading your gauge is the fuel level. It should never be more than 80% full. The reason is thermal expansion. Keeping your tank filled less than 100% ensures the fuel in your tank can expand with no risk to the tank or your safety.
Once your gauge reads 20%, it’s time to reorder your supply of propane.
Here is a quick video to help you read the gauge on your propane tank:
Large stationary propane tanks need to be recertified 10 years after their date of manufacture and every five years following that. But, as long as your above or underground propane tank was installed correctly and you perform proper maintenance on the tank, and connected appliances, your propane tank will remain suitable for use for decades.
Here’s a quick maintenance checklist:
Santa is known for its reliable delivery and exceptional customer service in Fairfield and New Haven Counties in Connecticut. Santa also offers automatic propane delivery, which means we’ll track the levels of your fuel and send out a new delivery before your supply runs out.

Above-ground, residential propane tank
When it comes to above-ground and underground propane tanks many homeowners initially think of looks; to them, an above-ground tank can be an eyesore. However, when it comes to deciding whether an above or underground propane tank is best for your home, there are several factors to consider apart from sheer aesthetics.
Specifically, the differences between cost, installation, and safety should be a priority for homeowners. Consider the following as you make your decision.
For an above-ground tank, the majority of the cost is in the purchase of the tank itself. And, the price of a propane tank will vary depending on how many gallons you’d like it to hold.
As you can imagine, the larger the tank you select, the more it will cost. However, with an above-ground tank, there are fewer costs associated with installation than its underground counterpart. Additionally, because of the accessibility of an above-ground tank, on-going maintenance will also be a bit cheaper.
Before installing an above-ground propane tank, you must check off a few administrative items first. For instance, ensuring distance requirements have been met and necessary permits have been obtained are critical steps. Additionally, it may be necessary to lay a concrete pad or concrete blocks for the stability of the tank.
These items are routine and fairly easy to knock off the list before installation. Better yet, a reputable propane company can do the legwork for you.
Watch how simple it is to install an above-ground propane tank.
The safety of an above-ground tank versus an underground tank will boil down to the geographic location in most cases. While above-ground tanks are more exposed and vulnerable to extreme climates, making them less durable during severe conditions, if you’re in an area prone to flooding, an above-ground tank is usually the safer option.
That’s because an underground tank can actually float away from your home if the water rises above the propane level in your tank. An above-ground tank stands a few inches off the ground and is bolted down at the feet, making it more stable and less exposed during flooding conditions.
Additional factors might include its susceptibility to humans. Above-ground tanks can be targets for vandalism. Furthermore, if you’re located near a road, an above-ground tank may also be vulnerable to vehicle collisions.
Whether you select an above-ground or underground option, the physical tank will cost the same. However, an underground tank will be costlier upfront due to the extra expenses for:
These special requirements to install an underground tank can roughly double the cost of the installation of an above-ground propane tank.
Further, underground tanks can be costlier to maintain. Underground propane tanks require an anti-corrosion coating to protect against underground elements that could damage the outer material. To ensure the coating is working correctly, it must be inspected and tested on a regular basis. And, if the anti-corrosion coating has been compromised, it will need to be replaced. These maintenance measures will come at an additional cost to the homeowner.
Similar to an above-ground tank, it’s critical to have the proper permits, arrangements and safety checks conducted before starting excavation. Once excavation has started, the process of installing an underground propane tank will take between 2-3 hours.
If your home has a septic tank, you may need to contact your septic company to dig the hole for the underground propane tank. Without coordination, it’s possible that the propane delivery equipment will run over the septic tank, which can cause costly damages.
Watch this video to see what the installation process for an underground tank looks like:
Generally, underground tanks are safer than above-ground tanks. One reason is that it’s easier for these tanks to stay temperate in extreme weather, especially in the freezing cold.
Underground tanks are also safer in the event of a leak. Propane is a green fuel, so if a leak were to occur, rest assured it would not harm the local water or soil. Unlike an above-ground tank, there is no chance for the fuel to escape into the air, causing a fire hazard.
Therefore, depending on your weather conditions, an underground tank is a safer bet. The exception to this rule is in areas at risk of flooding, where above-ground tanks are preferred.
As you can see there are advantages and disadvantages of both above-ground and underground propane tanks. For aesthetics and safety, underground tanks most often take the cake. However, if you’re on a tight budget, or live in a flood-prone area, an above-ground tank may be more practical.
Whether you decide on an above-ground or underground propane tank, make sure you choose the right energy company to partner with for support while selecting, delivery, and maintaining your equipment.


